It's all about combinations and permutations...
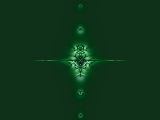
To avoid any confusion let's start with all the default settings for Sterlingware, which is best done by restarting the program. In the fractal window you will see the familiar start-up image:

F o r m u l a s
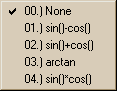
Now go up to the menu-bar and click on the first of the three "form" menus. This is the drop-down menu that you see:
The "1.)" formula is checked indicating that this is the formula that was used to generate the fractal we see in the fractal window. Slide your cursor over the second "form" menu, if it doesn't drop down then click on it. You will see formulas 18-35 displayed. Slide your cursor over the third and last "form" menu and you will see formulas 36-55. If you kept the default settings, only formula 1 on the first "form" menu will have been checked off. You can only select one formula at a time. There is really only one "form" menu here, the author has merely split them into three pieces to make them easier to display.
R e n d e r
Move your cursor over the next menu called "Rend". This is what you should see if you haven't changed the default settings:

There are 18 different settings but only the eighth one, "8.) fractal dimension" is checked off. Slide your cursor over the second and last "Rend" menu and you will see that there are more render settings bringing the total to 32. You can only select one "Rend" setting at a time. Again, there is really only one "Rend" menu, just split into two pieces.
I think the best way to show you how to use Sterlingware is to show you the precise number of options you have, because the creation of new fractals is merely the combination and recombination of different menu options like formula and render ("form" and "rend"). There are 50 formulas (0-11, 18-55) and 32 rendering options. Each formula can be "rendered" 32 different ways by selecting one formula and combining it with one rendering option. Our default fractal which we see on start-up is made from from formula 1 and render 8 ("8.)fractal dimension"). So, 50 formulas multiplied by 32 different rendering options gives us the potential to make 1600 different fractals just by working through all the possible combinations of these two menus.
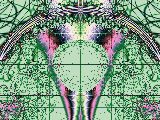
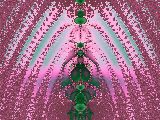
Let's do one example. If you've made any changes restart the program. From the third formula ("Form") menu check off formula 53. The image in the fractal window will immediately change to display the new fractal which formula 53 makes or "generates".

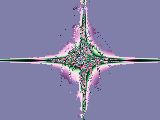
Now click on the first "Rend" menu and check-off "5.) orbit counting". This is what you should see:

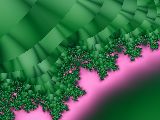
Doesn't look too exciting but then neither does the planet Earth when you're looking at it from a long way away, like the moon. Here's an important tip: When you generate a new fractal you have to zoom-in if you want to see all of it. Try zooming-in about 3 mouse-clicks in the center. This is what you should see if you clicked in the same spot I did:
There's alot more to see here. In fact, it would probably take you a few hours to see everything in this entire fractal because it is actually very big. Zooming-in to a Sterlingware fractal is just like standing on the moon and zooming-in with a telescope at the Earth. Initially the Earth looks small but with increased zooming or magnification, we begin to see millions of details. So you see, when you generate a new fractal you have to zoom-in and explore a little as the initial image can be uninteresting and deceive you into moving on to something else.
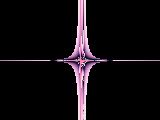
There's a few more Rendering possibilities. Reset the first "Rend" menu to option "8.) fractal dimension" and click the "Reset Coordinates" icon. You should be seeing our familiar Formula 53, Render 8 fractal.
Click on the second "Rend" menu. Options 30, 31 and 32 can be combined with the menu, "LDerivative". No other Rendering options can be combined with the "LDerivative" menu. I've tested this out and to the best of my knowledge it seems to be true. The "LDerivative" menu will only work with these last three Rendering settings.
Let's try it out. Check-off Render "30.) Lyapunov". This is what you should see:
Now click on the "LDerivative" menu. Option 1 seems to be the default setting. Check off Option 2 to get this:
This then will add 21 more options to each of Render 30, 31 and 32: (3x21=63). The number of potential fractals that can be generated by multiplying the Formula options by the Rendering options now becomes: 50x(29+(3x21)) = 4600.
We could now go through all 50 formulas using all 29+(3x21) rendering options but you are now able to do that yourself.
T r a n s f o r m
We will now look at the "Transform" menu. There is not much to know about it except that it gives you a few more variables to add to your basic formula and render combinations. Go back into the first "Rend" menu and select option "8.) fractal dimension". You don't have to reset the "LDerivatives" menu because when we are not using Render 30-32 it doesn't do anything. This is what you should see if you have selected Formula 53, Render 8 and not changed any other settings.
So click on the Transform menu. This is what you should see:
Check off option "01.)sin()-cos()". This modifies our fractal formula setting and rendering setting to generate this image:
You can only choose one Transform menu setting at a time, 00-04 (five options in total). This now adds four new variables which means our 4600 possible combinations (50x(29+(3x21)) can each be modified four more additional ways. 5152 x 5 = 23000. We have the potential now to make 23000 different fractals just by working through these different combinations of menu settings.
Reset the Transform menu to "00.)None".
J u l i a M o d e a n d I n s i d e / O u t
Click on the "Image" menu, this is what you should see:

On this menu there are a number of other things but only "Julia Mode" and "Inside Out" are options which modify the generation of fractals. These menu options are different from all the rest in that you can check off just one at a time or check off both of them together. So it is possible to have these four settings: 1. Julia Mode; 2. Inside Out; 3. Julia Mode and Inside Out; 4. none.
"Inside Out" merely "toggles" to one of the two possible settings of On (checked) or Off (un-checked). As mentioned before, it can be combined with "Julia Mode" even thought they are on the same menu. This multiplies our possibilities of 23000 by a factor of 4 to give 92000 combinations.
And now for something completely different... Here is where all my calculations go out the window. Julia Mode is activated or applied a little differently from other menu selections, which take effect immediately. And there is a special, and exciting, reason why Julia Mode is different. Click on the "Image" menu and select "Julia Mode". Nothing changes at first, but if you move your cursor over the fractal window you will see your cursor has changed to an asterisk-thingy with "Julia" underneath it.
To activate Julia Mode you now have to click on the fractal. However, Julia Mode gives a slightly different effect depending on where you click. Just as every point on the earth's surface has a different pair of longitude and lattitude coordinates, every point you click on in the fractal window has a different pair of coordinates. The two coordinate numbers form the basis for the Julia Mode calculation and so, choosing different points produces differing images.
One thing to note: Although you don't have to wait for a regular fractal image to finish calculating before you can zoom into it, after clicking with the Julia Mode cursor you have to wait until the new image is fully completed until clicking again. Otherwise, you will be inputting a new Julia coordinate and the image will be recalculated all over again according to the last place you clicked. If you look carefully, you will notice that the cursor does not return to a regular cursor until the new Julia image has finished calculating.
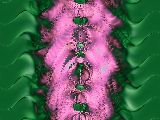
Let's do an example. We start again with formula 53, render 8. Now click on the "Image" menu and check-off "Julia Mode", if you haven't done it already. Place the asterisk over the center point in the fractal window and click like this:
You should get something like this.

Again, depending on whether you clicked in exactly the same spot as me, you may get something slightly different.
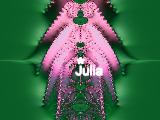
Now go back into the "Image" menu and un-check "Julia Mode". Click the "Reset Coordinates" icon to return to our familiar Formula 53, Render 8 fractal. Now check-off "Julia Mode" in the "Image" menu again. This time place the asterisk-cursor in the top right corner and then click like this.

You should see this:

As you can see, although we have the same menu settings we have created two different fractals. Since Julia Mode can have a different effect depending on where it is applied, it has almost unlimited possibilities. In fact, I suppose Julia Mode has as many possible settings as there are points in the fractal window to click on. However, a little experimentation will show you that when you click on points that are close together, you will also get results that are close together in apprearance.
The icon-bar can also be used to select Julia Mode. Just click on the "J" icon  in the icon-bar and it will do the same thing as using the "Image" menu. There is no icon for Inside Out but it can be selected from the right-click menu along with Julia Mode as seen here:

P a r a m e t e r D i a l o g B o x
For those of you who really enjoy experimenting there is a dialog box that allows you to fine-tune some of the fundamental fractal parameters. First, reset your menus to formula 53, Render 8 with out Julia Mode or any other options. Click on the "Fractal Parameters" icon  and you will see this dialog box with these default settings:
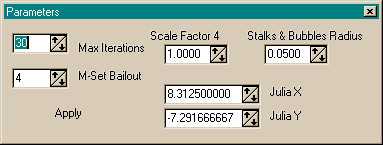
(If you've used "Julia Mode" since start-up there will be some numbers in the Julia X and Julia Y boxes, as there is in my screenshot.)
The main one I find of interest is "Max Iterations". Change it from the default of 30 to 10, then click on the word "Apply". You should now see this:

I don't fully understand the mathematical significance of all these parameters, but I can describe in general terms the effect it has on the appearance of a fractal. Lowering the iterations is like stopping the growth of the fractal. If 30 is a full-grown fractal tree then 10 is like a sapling and 3 is like a seedling. Try setting the iterations to 3 and see this:
Reducing the iterations can produce some interesting "baby" fractals. Now try 300:
Notice it takes longer to generate the fractal.
Since these dialog settings have numerous options I will just show a few examples.
"M-Set Bailout" only seems to apply to Formula "0". Increasing this number creates a more detailed fractal. See how the default setting of "4" (left) compares to a new setting of "40" (right).

"Scale Factor 4" appears to only apply to Lyapunovs. Below, a default setting of "1.0000" (left), and new setting of "10.0000" (right)

"Stalks and Bubbles Radius" applys only to Render options 2-5 and 14-18. It makes the "stalks" and lines thicker. For example compare the default setting of "0.0500" (left) with this new setting of "0.1000" (right).


"Julia X" and "Julia Y", as you may have guessed, allow for more precise location of the Julia cursor when using Julia Mode.
My intention has been to show what you can do with Sterlingware by demonstrating how the menus work in combination to modify the generation of fractals.
Here is a summary:
1.) Choose any formula.
2.) Add any Render.
3.) Options: Stop there or add Julia Mode or Inside Out or both, or any Transform. To Render 30-32 you can add any LDerivative.
Theoretically there seems to be an infinite number of variations once we factor in the Julia Mode. Now we are going to look at even more.
Lyapunovs
Contents